Ceph has been integrated with Proxmox for a few releases now, and with some manual (but simple) CRUSH rules it’s easy to create a tiered storage cluster using mixed SSDs and HDDs.
Anyone who has used VSAN or Nutanix should be familiar with how this works. “Hot” data is written/read using the SSDs and then also written to HDDs in the background. Once the data is no longer used for a period of time it is stored on the HDDs only, freeing up your SSDs for other operations. This gives you improved performance compared to an HDD-only storage cluster without spending a fortune on SSD disks.
My setup for this guide:
- Two HP DL380 G7 servers
- 2 x Xeon X5650
- 64gb RAM
- 1 x 32gb SSD (Proxmox install)
- Several 120gb SSDs (Hot tier)
- Several mixed size SATA disks (Cold tier)
- 10GbE network (192.168.1.0/24)
- Host 1: server68 (192.168.1.68)
- Host 2: server69 (192.168.1.69)
- Proxmox VE 5.3
The nitty gritty
Yes, I’ve been playing too much HQ lately.
Proxmox – Quick setup
I won’t go into the details of these steps here, they are covered by plenty of other blogs/tutorials.
- Install PVE on both hosts to the 32gb SSD
- Make sure both hosts can ping each other via hostname and IP
- Create PVE cluster with all hosts as member nodes
- Login to each host as root and apply the latest updates. You’ll receive a warning that a repository does not have a valid release file, this is fine (unless you have a valid Proxmox subscription).
apt-get update
apt-get dist-upgrade -y
reboot
Ceph – Initial Install
Prepare each hostto run Ceph by logging in as root and running the following command:
pveceph installNow, from just one host, run the following command to create the Ceph cluster:
pveceph init --network 192.168.1.0/24If you are using a dedicated network for Ceph traffic, or if your subnet is different than mine, replace 192.168.1.0/24 with the appropriate subnet value.
You should now be able to choose any host in the Proxmox GUI and see the Ceph configuration. There will still be some errors because not everything is initialized yet.

Create a monitor on both servers. In the Proxmox GUI drill into Datacenter > (Choose any host) > Ceph > Monitor and click the Create button.
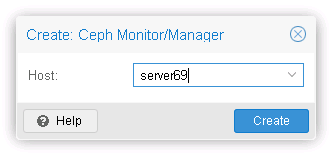
For production purposes Ceph recommends 3 monitors. If you are using 3 or more nodes in your cluster choose any 3 to install the monitor on. My cluster is just two nodes so I will install the monitor on both of them.
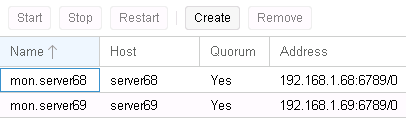
If we go back to the Ceph summary on any of our hosts, it should look a lot happier now.

Ceph – Add disks
A single physical disk is called an OSD or Object Storage Device in Ceph. We now need to create OSDs from our available disks. This can be done from the Proxmox GUI. Before we do that, though, we should take a look at our disk layout so we know what devices we’re working with.
From each host launch the following command:
lsblkThis will show you any disks and partitions in your system. Disks must be unpartitioned to use them as an OSD, so for any disks that have partitions run the following command:
ceph-disk zap /dev/<block device>In one of my servers, two disks have partitions.
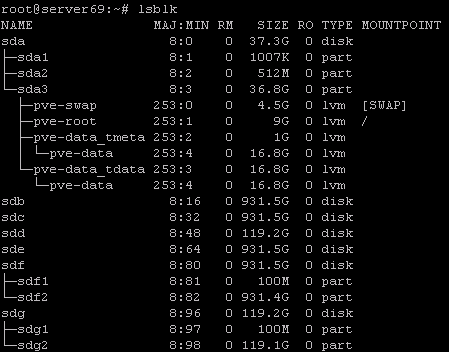
I will run the following commands to clear them.
NOTE: Don’t zap the disk where you have installed Proxmox!
ceph-disk zap /dev/sdf
ceph-disk zap /dev/sdg
Repeat the steps above on all hosts.
Return to the Proxmox GUI. Choose your first host and drill into Ceph > OSDs. Click the Create: OSD button. Select your disk, leave all other options as-is, and click Create.
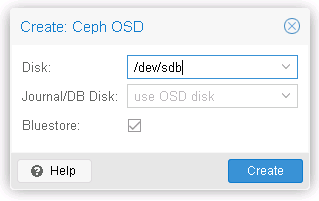
Repeat for all disks in your host, then proceed to the next host and create OSDs using the same process.
Once your are done adding all your disks, take a look at the OSD list, specifically the “Class” column. This value (HDD or SSD) is what we will use to determine what is cache and what is storage in the next section. If these values are incorrect, do some Googling to see how you can manually set them appropriately.
Ceph – Create custom CRUSH rules
From a root shell on any of your hosts, run the following commands:
ceph osd crush rule create-replicated ssd-only default osd ssd
ceph osd crush rule create-replicated hdd-only default osd hdd
Ok, so what did we just do? Let’s break the commands down:
ceph osd crush rule create-replicated – This is somewhat self-explanatory. We are creating a CRUSH map rule for data replication.
ssd-only – This is the name of the rule. Feel free to name it whatever you want, maybe “hot-tier” or “steve”
default – This is the root where the rule will be placed. Best to leave this as-is unless you really know what you’re doing, but then you wouldn’t be reading this post now would you?
osd – This is the fault domain. The fault domain instructs Ceph where to place the multiple copies of your data for redundancy. Because I don’t have many hosts, I’m going to tolerate only the failure of a single OSD. Ceph will place automatically objects accordingly. If I was to lose an entire host, I could feasibly have all copies of my data on different disks within the same host. This would be bad. If I had many hosts, I could use the value host instead and Ceph will make sure to keep different copies of my data on different hosts.
ssd/hdd – This is the device class to use for the rule. Remember when I said the OSD class was important? This is why.
Ceph – Create storage pools
Now we need to create our pools using the rules we just made. This can be done in the Proxmox GUI.
Navigate to Datacenter > (Choose any host) > Ceph > Pools and click Create.
Give your pool a name like “ssd-pool”.
Set size to 2 or 3, depending on host many disks you have and how much redundancy you want. In a vSAN/Nutanix world this would be the equivalent to the “RF” value.
Set min size to 1. This is the minimum allowed number of data copies Ceph will tolerate before preventing writes to the cluster.
Set the CRUSH rule to the “ssd-only” rule we created.
Do not check “Create storage”, we don’t want to map this pool to our Proxmox cluster just yet.
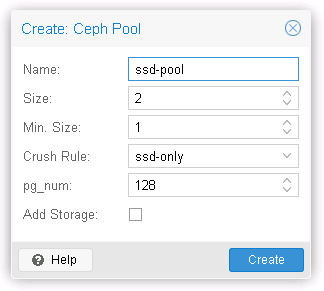
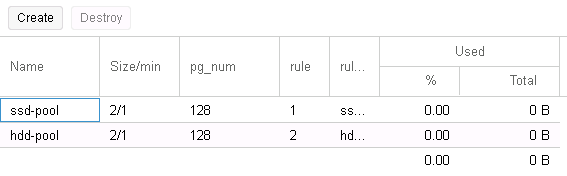
Click Create and repeat all steps for hdd.
Ceph – Enable cache
Now that we have our rules and pools, it’s time to configure our pool of SSDs to behave as the hot tier. Run the following commands from a shell on any host:
ceph osd tier add hdd-pool ssd-pool
ceph osd tier cache-mode ssd-pool writeback
ceph osd tier set-overlay hdd-pool ssd-pool
We’ve now set our pool of SSDs to act as the cache for our pool of HDDs. I won’t break these commands down in detail, more information on them can be found here: http://docs.ceph.com/docs/jewel/rados/operations/cache-tiering/
We still have to setup basic caching config. Run the following commands from a shell on any host:
ceph osd pool set ssd-pool hit_set_type bloom
ceph osd pool set ssd-pool hit_set_count 1
ceph osd pool set ssd-pool hit_set_period 3600
ceph osd pool set ssd-pool min_read_recency_for_promote 1
ceph osd pool set ssd-pool min_write_recency_for_promote 1
Again you can check out the link above for documentation on these commands, these should be sufficient for most setups.
But wait, there are still more commands to run! We have to decide what thresholds to define for flushing data back down to our storage tier. These values may vary depending on how much SSD storage you have.
ceph osd pool set ssd-pool cache_target_dirty_ratio 0.5
ceph osd pool set ssd-pool cache_target_dirty_high_ratio 0.75
ceph osd pool set ssd-pool cache_target_full_ratio 0.9
ceph osd pool set ssd-pool cache_min_flush_age 60
ceph osd pool set ssd-pool cache_min_evict_age 300
cache_target_dirty_ratio – Percentage (0…1 scale) of cache that is filled with “dirty” (or modified) data before it will start to write to backing storage pool.
cache_target_dirty_high_ratio – Percentage (0…1 scale) of cache that is filled with “dirty” (or modified) data before it will start to write to backing storage pool more aggressively.
cache_target_full_ratio – Percentage limit (0…1 scale) of cache utilization where eviction of data starts to occur. Both clean and dirty objects will be flushed at this threshold.
cache_min_flush_age – Minimum number of seconds data will live in the cache before it is written to backing storage
cache_min_evict_age – Number of seconds data will live in the cache before it is removed and remains only on backing storage.
We’re almost there!
Proxmox – Add RBD storage
We’re now ready to add our Ceph storage into our Proxmox cluster. Because the ssd-pool is a tier of our hdd-pool, adding the hdd-pool as an RBD in Proxmox will automatically make use of our SSDs.
In the Proxmox GUI select the root of your datacenter and drill down into Storage. Click Add > RBD.
Give your storage a name and select your backing storage pool, in my case it is hdd-pool.
If you use containers check KRBD, otherwise leave that off.

Click Add, and we’re done!
Testing
So how do we know everything is working? The first thing we need to do is create a VM on our Ceph storage to generate some activity. I’m going to install Server 2016 Standard in eval mode.
With the Windows install running and copying files to my VM hard disk, if I look at the Ceph overview page for the host my VM is running on I should see some activity.

Looking good! But are we using the cache? If we drill down into Ceph > Pools the usage and activity of both tiers will be listed.
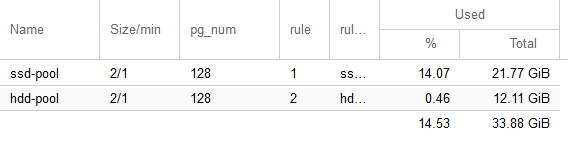
There we are! A fully hyperconvirged hybrid storage environment.
As for performance, here’s a disk benchmark from the Windows VM:
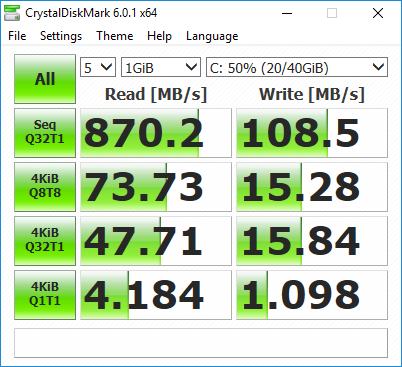
Not too bad for some old spare laptop drives. I could probably improve things further by using a dedicated network for Ceph, as well as getting better 10GbE cards.